Thursday, October 31, 2013

Chocolate Covered Pretzel Wands


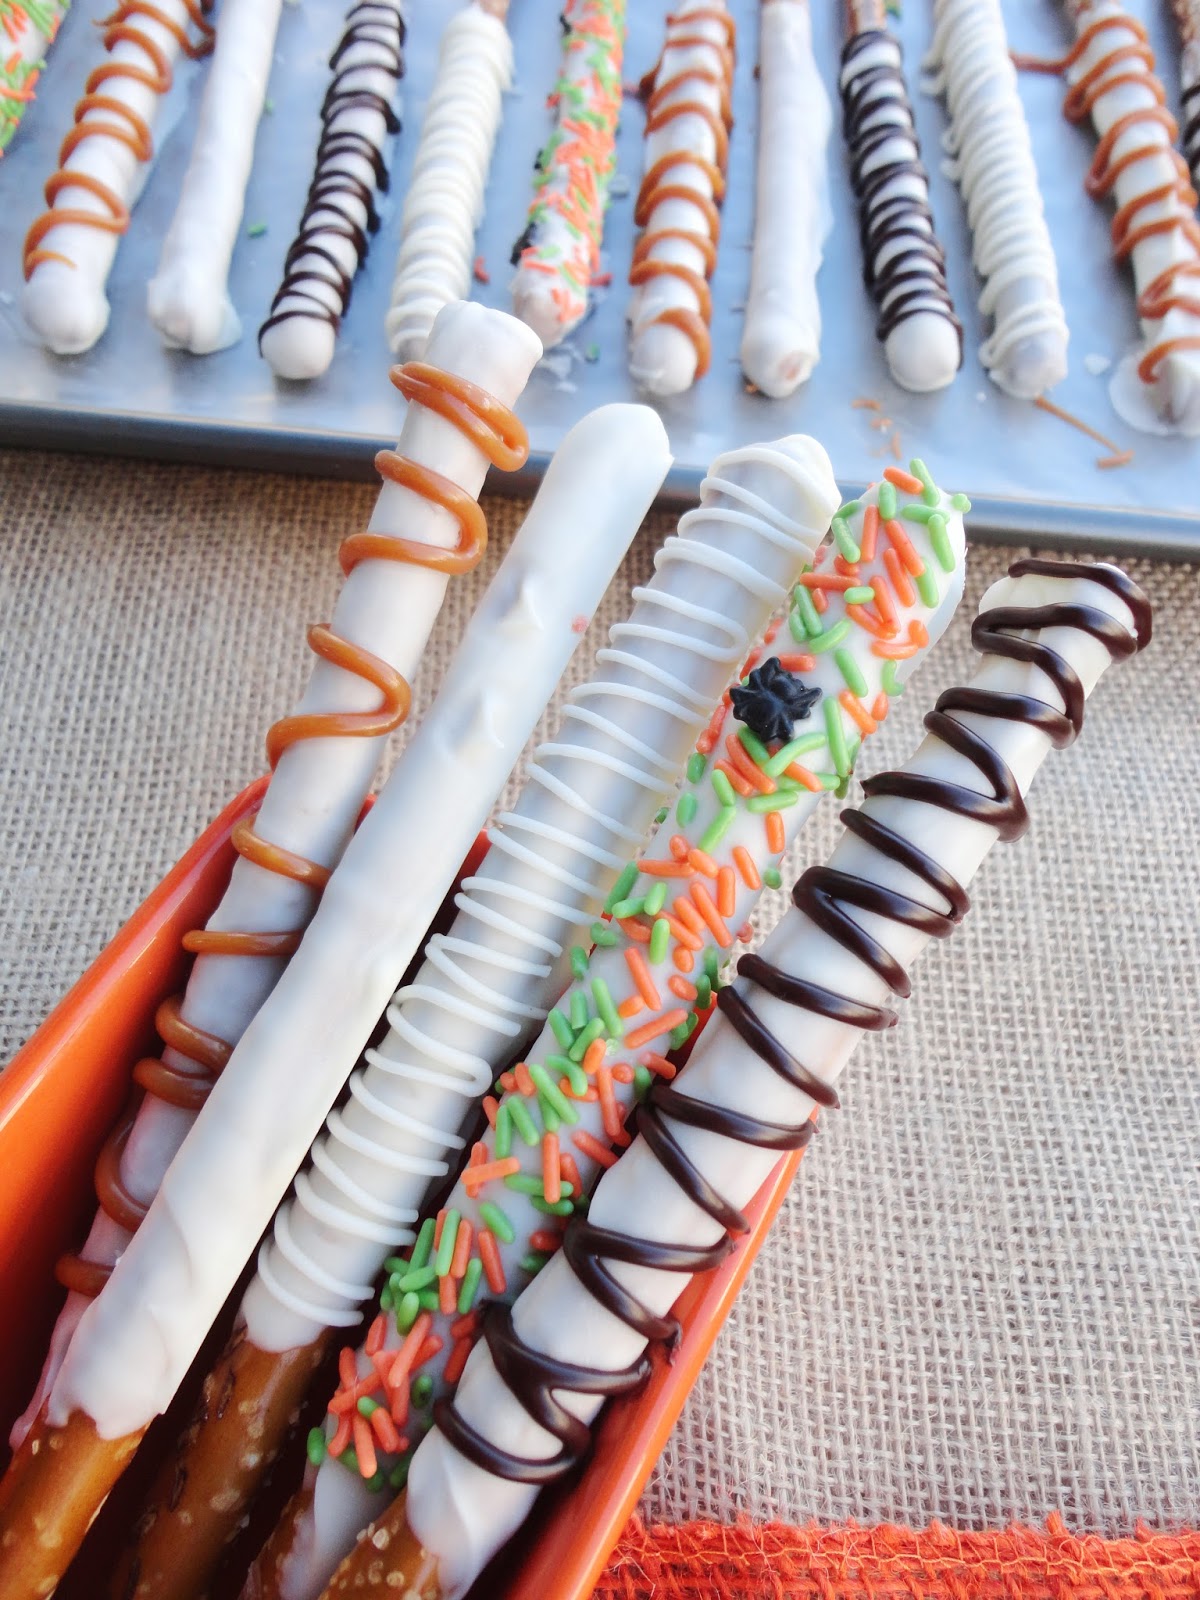
Ok you Harry Potter nerds (me included), this is a great excuse to make these delicious pretzel wands. Ok, you don't really need an excuse to make these, you can just make them because you want to.

During the holiday season one of my favorite things to make is chocolate covered pretzels. I kid you not, my mom and I would make hundreds of them during Christmas time to give to friends and family as gifts... and also to eat them by ourselves. I think it's one of her favorites, too!

While I was shopping the other day, I was looking for ingredients to make simple Halloween treats that didn't take a lot of time or a lot of ingredients. I was down the chip aisle when I saw the pretzels! I forgot how many different shapes and flavors and kinds there are, but there are a ton. So I saw these pretzel rods and thought, "Hmm... that could be easy, and quicker than the small twists!" and put them in my shopping cart.

These are so simple, a recipe is almost silly. But I'm sure some of you are like me and hit a creative wall every once in a while. That's why I posted several different toppings you can drizzle on these. You can make them all year around, too, if you just decorate them with themed sprinkles and even color the white chocolate!

For the toppings, I melted dark chocolate, caramel, and had some left over white chocolate. I put them in plastic sandwich baggies and snipped the tip off and drizzled them over the dried white chocolate coating. If you want sprinkles on them, you need to sprinkle them on while the chocolate is still wet so they'll stick! You can, of course, leave them plain, like you see in the photo, because they are good just like that!

Alright, enough blabbering. I'm pretty sure this post takes longer to read than to make this recipe!

INGREDIENTS
Optional toppings:
1 bag of pretzel rods
1/2 a brick (12 net wt oz) white almond bark
Dark chocolate chips, melted
Caramel, melted
Festive sprinkles
White chocolate chips, melted
Semi-sweet chocolate chips, melted
Butterscotch chips, melted
Peanut butter chips, melted

DIRECTIONS
1. In a saucepan on medium-low heat, slowly melt the almond bark. Do not melt too quickly or it will burn. Lay out wax paper on a counter or a few large cookie sheets. Set aside.

2. Once the almond bark is fully melted, dipped/roll/coat the pretzel rods in the bark and gently tap the excess off. To decorate with sprinkles, coat the wand while the bark is still wet. Place on the wax paper and let dry completely.

3. To decorate the pretzel wands with chocolate/caramel/butterscotch, pour the melted toppings into separate sandwich or snack baggies and cut of the tip of the corner. Drizzle onto the wands. Place in the fridge to set completely.

Monday, October 28, 2013

Toffee Caramel Apple Slices

Today's post is a guest post from Deauna at Honesty's Protegee and I'm excited to be a part of this fun blog swap event! So without further ado, I am turning this post over to Deauna!


Hi everybody. I'm Deauna from Honesty's Protégée. Over on my blog I write about food, DIY projects and crafts. I'm glad to be a guest blogger on Confections + Coffee for the Homemade Halloween Treats Blog Swap.

I love the flavor of caramel apples, but I seriously hate the actual caramel apple creation. Biting the apple, juggling it on the stick when it gets small... no thanks.

These apple slices though? Addictive and easy to make and eat. You can use whatever toppings you love. I love toffee. I know... buttery candy overload.


Toffee Caramel Apple Slices

3 Heath candy bars, crushed
4 small Granny Smith apples
1 (11-ounce) bag soft caramel candies
1/4 cup whipping cream

INSTRUCTIONS
Line baking sheet with parchment paper. Place crushed candy bars in shallow bowl. Using a slicer, slicer the apples about 1/4" thick. Place in a non-metallic bowl. Cover with cold water. For every cup of water, add one tablespoon of lemon juice. This will keep the apples from turning brown.

Heat caramels and whipping cream in medium saucepan over medium-low heat, stirring constantly, until smooth.

Dry the apple slices. Holding 1 apple slice, dip half in the melted caramel. Spoon crushed candy bars over the apple slices. Repeat with remaining slices and serve. Drizzle any leftover caramel over the slices. Apples can be refrigerated for several days; bring to room temperature before serving.


Below the collage are links to all of the posts that participated in our Blog Swap Meet: Halloween Party Treats!

Stop by and visit them all!

blog swap oct collage

Food Storage Moms posted on Dizzy Busy and Hungry

Dizzy Busy and Hungry posted on Food Storage Moms

Craft Dictator posted on If You Can Read You Can Cook

If You Can Read You Can Cook posted on Craft Dictator

Confections + Coffee posted on Honesty's Protegee

Honesty's Protegee posted on Confections + Coffee

Soda Pop Avenue posted on Cynfully Wonderful

Cynfully Wonderful posted on Soda Pop Avenue

Cooking the Recipe posted on Creative Southern Home

Creative Southern Home posted on Cooking the Recipe

Mammy2Grammy posted on Crafty Meggy

Crafty Meggy posted on Mammy2Grammy

Friday, October 25, 2013

Pumpkin Bread


I think flavored bread is one of my favorite things to make. Banana bread, nut bread, pumpkin bread, buttermilk bread... they are all so good! This leads me into this post all about pumpkin bread!

There are some tips to making a great pumpkin bread:

1) Do. Not. Over mix. - Similar to many bread-like recipes, you don't want to over mix the batter. It will become too dense and not tasty at all. You should stir the dry and wet ingredients together until just combined.

2) Do. Not. Over bake. - You don't want to burn your bread. It will turn out dry and crumbly. That's not how I like my pumpkin bread! I want it moist and dense and full of flavor! When you are baking the bread, you want the toothpick test to come out clean. If you are worrying that the top of your bread is getting too dark, you can lay a sheet of aluminum foil on top of the loaves and keep baking. It will still cook the inside but won't dry out the top of your bread.

3) Don't let it stick to your pan! - I have been foiled by my recipes sticking to my pans. It has happened many times until I learned a new trick! You can easily grease/butter and flour your pans, but to save time and butter, you can line your pans with parchment paper. This does two things. A - It keeps your bread from sticking to your pan. B - You can quickly pull out the bread once it's cooled and not have to worry about cleaning up the mess you make when you don't line it! Awesome!

4) Use a cookie sheet to hold your loaves! - For me personally, I bake these breads in disposable aluminum loaf pans because I sell them (also it's just a lot easier). These disposable loaf pans are kind of flimsy when they are filled with batter and can easily collapse and spill everywhere (true story). To save yourself from panic and worry you can place them on a large cookie sheet side by side. That way you can put them in the over all at once as well as taking them out at the same time. So easy!


Ok I've bored you enough with my bread baking tips. Let's get back to the bread itself. If you look at my pictures, you may wonder why the slices look so tiny. It's because I baked them in a teenie-tiny loaf pan (teehee!). I doubled this recipe for an order, so I had 6 loaves, plus enough batter to make myself a cute little loaf. It was like unintentional portion control. Woohoo!

In this recipe, 1 batch makes 3 - 7-inch x 3-inch loaves. Perfect to give to a hostess throwing a party, or to give it to school teachers who deserve it, or for the holidays as gifts! It's also a very easy recipes and doesn't require a hand or stand mixer! I used a whisk for the entire recipe. I love that! So that means you only dirty your measuring utensils, two bowls, and a whisk. Gotta love an easy clean up!


So now that you've got the tips to making perfect bread, you know that you can make a handful of loaves with this one recipe, and you are super excited that you're only going to dirty a couple of dishes, get on into the kitchen and start your ovens! (Was that too cheesy?)


Wednesday, October 23, 2013

Monster Bark


It's almost Halloween!

You know what that means right? Buying an inexplicable amount of candy only to end up consuming most of it yourself before the 31st ever gets here. Wait... that's not just me is it?

Just kidding! Kind of. I tend to stay away from the candy aisles at the grocery store so I DON'T do that. But I have, so far, bought 3 bags of caramels, 2 bags of candy corn, and a bag of Reese's mini cups. How did those get in my buggy???


I don't know about y'all, but I've been using Plymouth Pantry Almond Bark since I was a child. Yes, a child. I used to help my mom make chocolate covered pretzels (yum!) for Christmas. Don't you worry, I've got something good for you this Christmas. Lots of chocolate, peppermint, and easy gift-giving treats. ;)

Back to the bark. I have a ton of almond bark, and wanted to put it to good use. I also have all that extra candy corn, too. Some pretzels in my pantry... Oh and peanuts! Thus, Monster Bark was born. This is so simple, it's almost not a recipe! Except it is. What's great is you can customize it to your personal likings! For example: I like candy corn and peanuts together because it tastes like a Pay Day. So that's what I put in the bark! Pretzels make it taste like chocolate covered pretzels, and then I topped it with some cute festive Halloween sprinkles. Voila! Custom Monster Bark for Kelli.

Don't have any ideas on what to put in your own Monster Bark? Here's a few for you:
Pretzels
Chocolate Chips
Halloween Sprinkles
Candy eyes
Candy Corn
Candy Pumpkins
Indian Corn
Peanuts
Almonds
Cashews
Reese's Pieces
Reese's Peanut Butter Chips


Saturday, October 19, 2013

Pumpkin Tarts


Another great recipe brought to you by pumpkin! These are just the best little treats to whip up and take anywhere, whether it be a party, a staff meeting, or into your mouth.

Tarts are a special dessert. There are almost like pies. Almost. The crust is very crunchy and sweet similar to a shortbread cookie. The filling is creamy, full of pumpkin spice flavors. You can eat them plain, with whipped cream, or even whip up a buttercream! Regardless of what you top it with, you are gonna love it.


The crust is the same as the Dulce de Leche tarts. I found it on Smitten Kitchen, a food blog I just love. However, if you are in a pinch, you can make them with refrigerated pie crusts, and they will be equally good. If you use pie crusts, consider them to be more like tiny pies. Like I said earlier, a tart crust is more crunchy and shortbread-like. Once you have your crust handled, then you fill it with a pumpkin filling. Bake it for around 15-20 minutes, let it cool, top it (or don't) and serve! What a perfect fall treat.


This buttercream recipe is simple but I'm going to go ahead and leave it out of the recipe card. If you'd like to make it, here it is:

Vanilla Buttercream (This will frost 12 tarts)

Ingredients - 
8 tbsp (1 stick) butter, room temperature
1 tsp vanilla extract
1-2 tbsp heavy cream or whole milk
2 C powdered sugar

Directions -
1. Cream the butter, milk, and vanilla until smooth. Add in the powdered sugar in small increments until fully combined. If desired consistency is not met, add in more milk to make it thinner or add in more powdered sugar to make it thicker.


Pumpkin Spice Cinnamon Sugar Donuts


You can imagine how good this donut tastes, right? A warm baked donut filled with the flavors of fall: pumpkin, cinnamon, pumpkin pie spice; then coated in a crunchy cinnamon sugar layer. Yum.

I love baked donuts. I'm sure I've said that in a ton of different posts, but I just do! Maybe my next venture is down the classic powdered sugar donut avenue? Or even a chocolate chip baked donut! Or even a chocolate baked donut!!

There is one thing you need to know about donut batter. Do. Not. Overmix. If you overmix donut batter, it will turn out to dense and just yuck. No one wants a yuck donut. So when you're mixing the batter, just stir in the dry ingredients until it's just combined. It will be thick and seem lumpy at times but it makes your donut fluffier!

Ok! Enough with the fluffy/not fluffy advice, let's get down to baking business!


Dulce de Leche Tarts


Caramel and chocolate is a great combo, don't you agree? The milky sweet creamy caramel mixed with the rich and bitter flavor of dark chocolate. It just sounds perfect.

This tart was inspired by the Dulce de Leche cheesecake bars I made last week. People dug it. So I decided, when I was putting this week's menu together, to do a Dulce de Leche tart. They were very popular!


There's not much to this one, which is great! I used a homemade tart recipe, but you can use refrigerated pie crust to keep it simple. You cut out pastry dough to fit the cupcake tins, you bake it for about 10-15 minutes, then you fill it with caramel and top with dark chocolate! You can even add a little sea salt for that salty-sweet balance.

You can't go wrong with a 20 minute recipe. Well... maybe you can... but this one is easy!

Let's keep this post short so you can get to the good stuff quicker!

INGREDIENTS
2 Refrigerated Pie Crusts
1 can (13.4 oz) Dulce de Leche**
1/2 C Heavy Cream or Whole Milk
1 C (6 oz) Dark Chocolate Chips
Flaky sea salt for sprinkling (optional)
Note: You can find the Dulce de Leche down the Hispanic aisle at your grocery store. It's made by Nestle.

DIRECTIONS
1. Preheat oven to 350 degrees F. Grease 2 cupcake pans and set aside.

2. Roll out the refrigerated pie crust and cut out 24 circles. They should be the same size as the top of the cupcake tin.

3. Place the pie crusts into the cupcake tins, gently pressing down to make a shell. Bake for 10-15 minutes or until the crust is a light golden brown. Let cool in the cupcake pan.

4. Heat the Dulce de Leche in a small bowl in the microwave for 30 seconds until it's warm. Spoon about 1 teaspoon into each of the tart shells.

5. Heat the cream and the chocolate chips in the microwave for 30 second increments, stirring after each time, until you get a smooth consistency. Pour enough chcolate into each tart shell to cover the caramel, but being careful not to pour over the edges.

6. Place the tarts in the fridge for about 30 minutes to let it set. Top the tarts with a pinch of sea salt if desired.

Wednesday, October 16, 2013

Cinnamon Roll Baked Donuts


I just came back from a weekend in Dallas. I am originally a Texan and I spent most of my childhood living in the Houston area. Dallas and San Antonio are like homes away from homes to me. So naturally, when I went down to Dallas for the OU/TX football game and the Texas State Fair, I HAD to stop to eat at some of my favorite places!

One of my Texas favorites is Shipley Donuts. I have been eating Shipley's since before I can even remember. On Sundays my mom would take us to get donuts and kolaches at Shipley's, then we would buy the Sunday newspaper from the man in front of the store. We would go home and I would read the funnies and the store ads. It was one of my favorite traditions! Weird, huh? Not to me! And it was still just as good as I remembered it!

(P.S. If you don't know what a kolache is, you can make them and try them for yourself! Click here for my very own recipe!)
To wrap up this trip down memory lane, I have loved donuts for a long long time. But over the years, your kid taste buds turn into grown-up taste buds, and you really can't handle those fried donuts like you used to. Baked donuts have easily become my favorite breakfasts! They aren't too sweet and they come in a variety of gourmet flavors! Which is why I came up with cinnamon roll baked donuts. 

This recipe is pretty simple! It only takes about 30 minutes from start to finish, as well. First you make the cinnamon roll topping. You will melt some butter along with brown sugar, cinnamon, and a couple other ingredients in a sauce pan. What you're doing right there is making that delicious amazing cinnamon roll filling. The best part! Next you will make the batter, it's a basic recipe; flour, sugar, baking powder, egg, milk, etc. You'll mix it until just combined, then pipe it into the donut pans. Cook these pretty things for 7-8 minutes, take 'em out, and glaze them with a powdered sugar glaze. Done! Enjoy them warm or room temperature, they taste amazing either way.

Did you have a favorite donut shop you enjoyed when you were younger or even now? 

INGREDIENTS
CINNAMON ROLL TOPPING:
2 tablespoons butter
2 teaspoons ground cinnamon
5 tablespoons light brown sugar
1 teaspoons milk
1 teaspoon cornstarch
DONUT BATTER:
4 tablespoons butter, room temperature
1/2 cup milk
1 egg
1 teaspoon vanilla extract
1 1/2 cups all-purpose flour
1/2 cup granulated sugar
2 teaspoons baking powder
1/2 teaspoon salt
GLAZE:
3/4 cup powdered sugar
Dash of milk

DIRECTIONS
Preheat oven to 350°F. Grease a 6-cavity donut pan and set aside.

CINNAMON ROLL TOPPING:
Melt the butter in a saucepan on medium-low heat. Add the cinnamon, brown sugar, milk, and cornstarch. Heat until it just bubbles. Take it off the heat and pour about 1/2 tsp of the mixture into the bottom of each donut cavity.

DONUT BATTER:
In a medium bowl, cream together the butter, milk, egg, and vanilla. In a separate bowl, sift together the flour, sugar, baking powder, and salt. Pour the wet ingredients into the dry and mix until just combined.

Pipe or spoon the batter into the donut cavities about 2/3 of the way full. Bake for 7-8 minutes and turn out on a wire rack to cool.

GLAZE:
Using a fork, whisk the milk into the powdered sugar until desired consistency. Using a piping bag or a plastic bag with the tip cut off, glaze the top of the donuts.

Tuesday, October 15, 2013

Coffee Break #2

My how October has flown by! I feel like I've blinked once and it's already halfway over!

Here's what I've been up to the last couple of weeks:

Getting Local at the Plaza Festival in OKC.

My friend, Irene, and me in Dallas for OU/TX.

My handsome S/O <3

I hemmed my own jeans! You would never know...

October is Breast Cancer Awareness Month. Salute the Pink Warriors!

Mason Jar gift at a wedding I attended last weekend!

A sweet couple celebrating their love last weekend!

I visited a Shipley Donuts while I was in Dallas this weekend! So great!

The coolest "ride" at the Texas State Fair! My two favorite things, LOTR + HP! *nerd alert*

A delicious meal at a delicious Mexican restaurant in Garland, TX called Cuquita's.

Another Texan favorite, Taco Cabana. They shut the only one in Norman down. It was a much needed visit.

I bought a Gemma Correll Pug Mug at Urban Outfitters. My favorite! ;)

Puppy love and knitting on a cold day. Always a great pastime.


Here are some great things happening on my blog!


My Key Ingredient transition is a steady progress. You can see current recipes with the Key Ingredient integrations. I'm a little over half way done with the older posts, and you can find those with the recipe card as well. A steady progress indeed! If you haven't heard of Key Ingredient, it's a great website where you can create, share, and find all kinds of recipes!


Now you can follow my blog on bloglovin! If you haven't heard of bloglovin before, it's pretty neat. It keeps all your blogs in one site, where you can keep updated, get alerts, follow blogs, discover blogs and more! Definitely a great investment if you like to follow blogs daily, and you can easily sign up with Facebook or your email!


Another great addition to the blog! I now sell my baked goods! I'm trying to get my name out locally and have started a weekly menu along with custom orders! The best part is now I have an order form, so no losing your orders in the comments or posting all over Facebook. How exciting! Click here to see the whole page.


Just a reminder: you can follow me on Facebook! I post regularly, new and old recipes, along with my weekly menu, and other fun things going on in my world. A great way to stay updated in today's technology!


One more awesome feature, now on my Facebook page, is that you can visit my blog without having to go to any particular link! It might seem a bit redundant, but sometimes it's just nice to start from the home page. Ya dig? :)

Thanks for sitting and enjoying this coffee break! Until next time!

Mini Pizza Rolls

I don't know about you, but when I was a kid, pizza was my favorite food ever. I loved Mexican food, but I also had a huge space in my heart for pizza. I still do, to this day, but since J doesn't eat pizza, I don't normally get delivery for fear of eating the whole thing by myself (yes, this has happened before).


You just can't go wrong with pizza! You can get any topping, or not topping (my favorite is and always will be cheese), you can get different crusts, you can get dessert sticks or cheese sticks, you can get extra anything you want, because that's how pizza works. It's perfect for families and parties because you can get half cheese and half pepperoni on one pizza. It's just genius to me.


So the other day I was thinking, "Man, I really just want to plain cheese pizza, but I don't want to buy and whole one, nor do I want to leave the house." <--- This is a frequent problem, btw. Then I remembered that I had pizza sauce and mozzarella cheese in my fridge! Ah, yes! I just need a crust of sorts! That's when it hit me: crescent roll dough.

Yes, ladies and gents(?), crescent roll dough pizza rolls. You heard it right, and I bet you are sitting in your chair or on your couch and thinking, "Oh my, that is perfection." Or perhaps you're already running to your fridge to get your ingredients. I don't blame you.


So this recipe is as easy as it sounds. Roll out the crescent roll dough, split in half so you have two pieces of dough with 4 triangles in each. Pinch the dough together to close up the seams, and then pinch the dough on the other side. Spread the sauce thinly and sprinkle with mozzarella cheese. If you like mini pepperonis, go ahead and sprinkle them in there. Then roll it up, cut into 8 slices, and place into a greased mini muffin tin. Do this with the other piece of dough. Bake at 375F for 12 minutes and you are ready to go!

Oh, and you're welcome. ;)


Friday, October 11, 2013

Snickerdoodle Pie

Who doesn't love a soft snickerdoodle cookie? Fluffly but thick, covered in cinnamon sugar. I don't know a single person who doesn't like snickerdoodles. Even those chocolate fanatics like them!


This pie is like a giant fluffy snickerdoodle cookie. It's got that classic snickerdoodle taste by use of the cream of tartar, with a delicious cinnamon swirl syrup topping that is baked in. You can use your own homemade crust or a store bought crust. If you do buy a crust (totally understandable), go ahead a purchase the refrigerated rolled up crust found by the cookie dough in your grocery store. It's fluffly, flakier, and much better!


It's an easy recipe and takes all of 10 minutes to prep. You are going to brush the bottom of the pie crust with melted butter and cinnamon sugar. Then you are going to whip together the classic snickerdoodle ingredients: flour, sugar, milk, an egg, baking powder, and the classic cream of tartar. Next, you'll quickly melt more butter with some brown sugar, vanilla, and cinnamon to make a bubbly sweet syrup to go on top. You'll bake it for a total of 35 minutes and let it cool before serving. Easy as that!


Thursday, October 10, 2013

Dulce de Leche Cheesecake Bars

Who doesn't love caramel?

I mean, it's milky, creamy, sweet, and has the best indescribable taste. When someone asks, what does caramel taste like? I can only say, Well... it tastes like caramel! You just can't explain it! But now that I think about it, I hope no one asks that!


I made this recipe for a Mexican dinner night I had with friends last week. I made cheese and green chile enchiladas, my friend Irene brought this delicious black bean salad with black beans, avocado, tomatoes. It was so good! Then for dessert, we ate this!

This recipe was a little time consuming, so I made it earlier that day to give it time to chill before we divulged in it. The Dulce de Leche itself was the most time consuming, and then baking the cheesecake took 45 minutes. But while it was time consuming, it was also really easy. Read my directions below before you start so you can time manage properly.

First, before you start anything, set out the cream cheese. Let it soften naturally so your cheesecake filling will be light and fluffy. Try your best to not microwave it to soften it, because this liquifies the cream cheese and the density is heavier.

Second, get that crust in the oven and out of the way. It's super quick and easy. You'll want to focus your time and efforts on the Dulce de Leche. Dulce de Leche, by the way, is basically a Spanish caramel. It is translated to "candy of milk" and is a caramelization process of milk and sugar. This is unlike caramel, which is just a caramelization of sugars only (no milk). Most caramel candies, however, are made of milk and sugar, so this is going to taste similarly to those square caramels you buy from Kraft. You know... those ones you eat about 20 of before you realize you just ate 20 of them.

To make the Dulce de Leche is quite easy, but it needs your constant attention while you're making it, or you might burn it, which is no bueno. You are going to pour your condensed milk into a sauce pan and heat it on medium-low heat for quite a while. Mine took about 20-25 minutes. When you pour the condensed milk in, it will be a nice milky-white color. At the beginning, let it cook and stir occasionally, keeping an eye out for bubbles. If it starts to bubble, stir more frequently. You're going to see it turn into multiple shades of beige and brown before it gets to where you want it, which will look like the color of real caramel (and some say you can also compare it to the color of peanut butter). Once it starts turning to a light beige, you'll need to be stirring it very frequently, watching for the color changes and making sure none cooks to the bottom of the pan. Once it gets to the perfect color of brown, take it off the heat and pour it onto the graham cracker crust. You'll place that aside for about 5 minutes to cool, then place it in the fridge while you make your cream cheese filling.

It's really not that hard! I'm always wary of trying new baking/cooking processes, especially on things that are so sensitive (caramel, yeast, etc) that if you don't do it properly it could ruin the recipe. But if I can do it, so can you! You're going to love this recipe!

INGREDIENTS
Crust -
1 C graham cracker crumbs
2 tbsp granulated sugar
3 tbsp butter, melted
Dulce de Leche -
1 - 14 oz can of sweetened condensed milk
Cream Cheese Filling -
16 oz cream cheese, room temperature
1/2 C granulated sugar
2 eggs
2 tsp vanilla extract
The Glaze -
3 oz semi-sweet chocolate chips
4 tbsp butter

DIRECTIONS
1. Preheat oven to 325 degrees F. Line an 8" square baking dish with parchment paper and grease the parchment paper with non-stick spray.

2. To make the graham cracker crust - Mix the graham cracker crumbs and sugar together, then pouring in the melted butter. Press into the bottom of the baking dish. Bake for 10 minutes and let cool.

3. To make the Dulce de Leche - Pour the sweetened condensed milk into a small sauce pan. Heat over medium-low heat, stir constantly, for about 20 minutes. It will turn from a milky white color to a lovely caramel color. Pour the Dulce de Leche into the graham cracker crust and place in the fridge while making the cream cheese filling.

4. To make the cream cheese filling - Beat the cream cheese until fluffy. Add in the sugar until well combined. Add in both eggs and vanilla and beat until fully incorporated. Pour on top of the Dulce de Leche layer.

6. Bake at 325 degrees F for 45 minutes until the center is only somewhat jiggly. Let cool completely before placing it in the fridge.

7. To make the glaze - Melt the butter and chocolate chips in a microwave safe bowl at 30 second increments until fully melted. Pour on top of the cheese cake and chill in the fridge for 30 minutes. Serve by cutting into squares. Store in the refrigerator.

Monday, October 7, 2013

Mini Cinnamon Rolls

This is not a trick. This is ingenious. Mini. Cinnamon. Buns. Takes all of 15 minutes. Great for a make-ahead breakfast, a brunch dish, a wedding shower dish, or whatever excuse you can come up with to make them!


I really feel no need to explain this recipe. It's so simple, it's 6 ingredients. Crescent roll dough, melted butter, brown sugar, and cinnamon make up the cinnamon rolls themselves. Powdered sugar whisked with some half & half makes the glaze. That's it! You're done! One messy bowl, one messy mini cupcake pan, and one messy cutting mat. Dishes are done before they even come out of the oven!


Saturday, October 5, 2013

Soft & Chewy Chocolate Chip Cookies

Alright. We hear it all the time. This is the best chocolate chip cookie ever! Ever! EVER! They may be right. But as a real lover of all things cookie... I think the variety of chocolate chip cookie recipes is just fantastic! Sometimes I want a crunchy cookie, sometimes I want a soft cookie, sometimes I want a three-different-kinds-of-chocolate cookie, sometimes I want a cookie that is not the same one I make all the time.


Does this make sense? It does to me!

So this recipe is that indulgent soft and chewy chocolate chip cookie that is wonderful straight out of the oven. No crunch involved, this cookies is thick and sweet and full of chocolate chips.


Friday, October 4, 2013

Follow Me on Blog Lovin'

Follow my blog with Bloglovin
I got a Blog Lovin' account! Follow me on there! You can sign up via Facebook!

Thursday, October 3, 2013

Oreo Cream Cheese Cookies

I mentioned in a previous post about the Oklahoma State Fair cookie jar contest and how I had themed cookies in the jar that represented all the delicious foods at the state fair. This is another one! It represents the deep fried Oreo that is probably the fattiest thing AT the fair. As a matter of fact, I had it just last week. It was amazing.


So this cookie is a cream cheese cookie batter with an Oreo crust. It's crunchy on the edges and chewy on the inside. The Oreos are just delightful and the cookie is just plain good. The contrasting textures and flavors make this an overall great cookie to make for the chocolate lover without having to trial and error a million chocolate cookie recipes. (I still haven't found a great one, or chocolate cake either! One day!)

Fried Oreo Goodness!